iCorrect EditLab Pro includes two image processing tools that go beyond color correction: sharpening and noise removal. Note that these tools are only available when EditLab is set up to edit images. ICC profiles and ColorCircuits are used strictly for color transformations, so sharpening and noise removal are not applicable.
With EditLab, you can apply sharpening and noise removal in combination with color correction. This is especially helpful in cases where noise in an image is exaggerated by a color transformation. Noise is commonly introduced into images by digital cameras and scanners during the digitization process. Applying a color correction to remove color distortions typically "stretches" the color space, which tends to make any noise even more noticeable.
Check the Sharpen checkbox to apply unsharp masking to the image. Check the Remove Noise checkbox to apply an adaptive noise removal filter to the image. Note that the preview image cannot display the effects of sharpening and noise removal unless you are zoomed in because unlike color corrections, these effects depend on the resolution of the image. You must also have checked the Preview Sharpening and/or Preview Noise Removal checkboxes in the Preferences window. This kind of image processing may cause a noticeable delay in updating the preview. If you find it objectionable, uncheck those preferences and use the Sharpen / Noise Removal setup window to preview these effects.
Click the Setup... button to open the Sharpen / Remove Noise setup window, from which you can set parameters that control the strength of these effects:
The sharpen controls are displayed only when the Sharpen checkbox in the main window has been checked, and the noise removal controls are displayed only when the Remove Noise checkbox in the main window has been checked. Since sharpening can also make noise more pronounced, if you will be applying both effects, it is usually beneficial to set them up and preview them together.
The image in the upper right is a thumbnail of your complete image and is used for navigation purposes. The marquee you see on it represents that portion of the image which appears in the view to the left. You may drag the marquee to pan around the image.
The image on the left is a close-up view of a smaller portion of the full image, displayed after noise removal, color correction and sharpening. You may zoom the image by clicking the + and - buttons. You may pan around the image by using the mouse to drag other portions of the image into view.
Note that as you are panning around the image, it is displayed without noise removal and sharpening until you release the mouse button. Similarly, as you adjust the slider controls, the image is not updated until you release the mouse button.
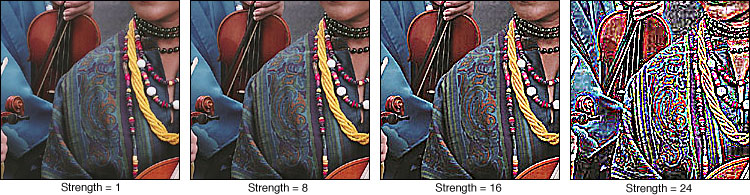
The Sharpen Strength slider value can range from 1 (very weak) to 24 (very strong).
The noise removal controls are grouped as Red Chrominance and Blue Chrominance. The effect of the red chrominance controls is seen primarily in the red channel of the image, although it does have some small influence in green and blue. Similarly, the blue chrominance controls affect the blue channel most strongly, but also change red and green by smaller amounts.
Properly set up, these controls can do wonders towards removing unwanted noise without destroying fine image detail. Improperly set up, they can ruin your image. Therefore, it is important that you take the time to carefully set these parameters. Our experience to date has shown that once the proper settings have been found for an image from a given camera or scanner, these settings will work for other images that come from that specific device. In other words, you should not need to adjust these parameters on an image-by-image basis.
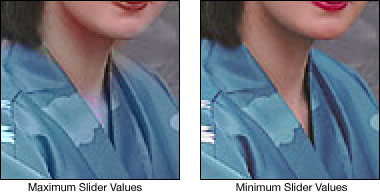
With experience, you will develop your own techniques for setting these controls, but here is one method that seems to work well. Start by setting all four sliders to their maximum values. These maximum settings will probably result in problem areas in your image, such as corners being "rounded off", and loss of other color detail. This can be seen in the neckline in the image on the left:
Explore your image, looking for such problems. Then reduce the parameter values until the problems just disappear. Adjust the blue chrominance values first, followed by red chrominance. As a general rule, you should use the largest threshold and radius that does not change the overall tone of any region. The goal is to remove the noise without changing the overall tone.
We have found that "typical" values (if there are such things) are radius of 4 to 8 and threshold of around 16.
Clicking the Restore Defaults button will set all the controls in the window to the factory default values, that is, the values that were present when EditLab was first installed.
Click the OK button to save the new settings, or Cancel to return to the main EditLab window without changing them.