|  |
How to Improve the Color of Your Old Photos and Scans
Do you have any old photographs in your family album that have faded, darkened, or become discolored with age? Or perhaps you have some old scans that could use some improvement. If so, you may want to consider restoring them to their original luster with the help of good digital photo editing software. BTW, nothing makes you a bigger hero with family than restoring these faded memories to their former glory.
One of the most useful programs for restoring the color of old photos is iCorrect EditLab Pro which is available as a plug-in for Adobe Photoshop, Photoshop Elements, and Corel PaintShop Pro. It is also available as a stand-alone application for high-volume projects. With iCorrect EditLab Pro, it couldn't be simpler to restore an aged, discolored photo or revitalize a mediocre scan.
The hallmark of iCorrect EditLab Pro is its SmartColor Technology. The term SmartColor actually encompasses two distinct, yet related features. First, the SmartColor button provides an auto-correction function by analyzing the photo and making initial adjustments to color balance, tonal range, exposure, and saturation. Second, it refers to the way the underlying technology handles color and light in such a way that preserves and protects any adjustments you make. iCorrect EditLab Pro has four color editing tools arranged in a particular sequence. The tools are designed in such a way that as you progress from left to right, then any changes you make with one tool will not, and in fact cannot, affect any of the changes made with any of the tools to its left. This alleviates the common frustration of correcting for one thing while throwing off another - aka "chasing your tail" syndrome.
| 
Click for Larger Image
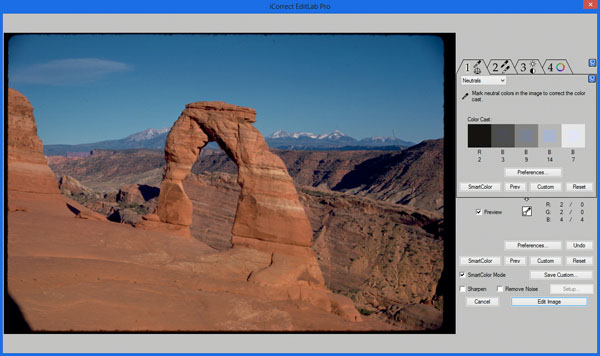
| For this photo, let's start by clicking the SmartColor button in the lower portion of the main control panel. When SmartColor mode is enabled, EditLab Pro analyzes the photo and automatically sets most of the controls for all tools to values that will be good starting points for that particular photo. In other words, SmartColor does much of the work for you leaving you with the much smaller job of making minor adjustments to any of the controls as you see fit. With this photo of the famous Delicate Arch in Arches National Park in eastern Utah, it has made initial adjustments to the color balance, tonal range, exposure and saturation. Notice that the gray scale step wedge indicates that SmartColor has automatically corrected for the dominant blue color cast throughout the photo.
| .jpg)
Click for Larger Image
| In most cases, the recommended progression through the four editing tools is 1, then 2, then 3, etc. But in this case, because the most prominent colors in the photo are so faded, we might want to adjust them first with the HueSelect Control tool in tab 4 first, then revisit tools 2 and 3 to make minor refinements to the overall photo later. Let's start by adjusting the color of the sky. Notice how the initial SmartColor mode set the HueSelect Control Points to the prominent colors including the sky and the arch. To activate the Control Point that corresponds to the blue sky, simply click on an area of the sky in the photo. Now click the Memory Color button for Sky to automatically correct the color of the sky. Notice how it not only shifts the hue away from cyan, but also adjusts its overall brightness and saturation as well.
|
.jpg)
Click for Larger Image
|
The colors in the famed Delicate Arch also lack that pop we are looking for, so we activate the Control Point that corresponds to the prominent orange-ish hue then boost its saturation and darken it a bit to add richness and depth.
|
.jpg)
Click for Larger Image
| Finally, we might want to make further refinements globally with the controls found under Tab 3 which addresses exposure, contrast, and saturation. Notice how we are able add more texture and bring out even more detail in the rock layers by independently adjusting the highlights and shadows as well as increasing the contrast and saturation.
That's all there is too it. Once you get the hang of it and see how well SmartColor Technology and HueSelect Control Points preserve and protect your edits as you go, you'll be amazed at how fast and easy restoring your old photos - and improving your new ones - can be.
| |
|
| |  |